I’m loving NuGet and it’s totally changed the way I look at bringing in external dependencies to my projects. I’ve written about that before.
Sometimes, you need to install several packages into a project. For example, when installing SpecFlow, you might also need a test framework like NUnit or MsTest, and perhaps an assertion or mocking framework.
If you want a package that includes your or your company’s preferences, and is not necessarily suitable for publishing to NuGet.org, here’s how to create a local package with dependencies only.
Strategy
Our approach is to create a package that contains only dependencies—no code—and store it in a local NuGet Repository.
Install NuGet Package Explorer
Most of the work will be done in the .nuspec file, an XML file that you can edit with any text editor or use the excellent NuGet Package Explorer. Download it now; you won’t regret it.
Create a Local NuGet Repository
A local NuGet repository is simply a folder containing NuGet packages. Here’s how to set it up:
- Create a folder (e.g.,
C:\Dev\LocalNuGet). - In Visual Studio, go to Tools → Library Package Manager → Package Manager Settings, and add your folder path to the Package Sources:
-
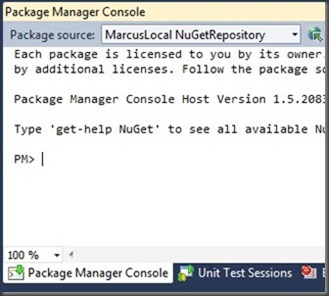
Verify everything is set up correctly by going to the Package Manager console and selecting your package source in the drop-down menu:
Create the NuSpec File
Open NuGet Package Explorer and fill out the basic information about your package (Id, Name, etc.). To edit the package metadata, go to Edit → Edit package metadata (CTRL+K).
Scroll down to the dependencies section:
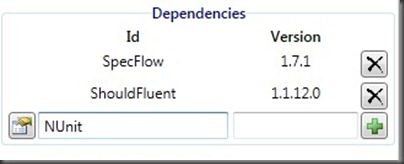
Click the big + button to add dependencies. Use the search dialog to find the packages you need:
You can switch the Package Source to the official NuGet repository to pull dependencies from there, keeping your local package lightweight.
Export and Test
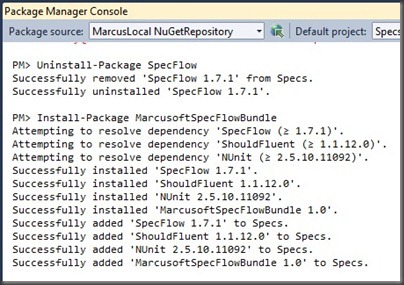
Save your package into your local package source directory (C:\Dev\LocalNuGet in this example). This will create a .nupkg file with only dependencies.
To test your package:
- Open a project where you want to add your package.
- Go to the Package Manager console.
- Select your Package Source.
- Type
Install-Packageand hit tab to see your local packages. -
Select your package and press Enter.
Conclusion
Using this method, you can:
- Use
Uninstall-Package –RemoveDependenciesto remove your bundle with its dependencies. - Create packages that build on top of each other. For example:
SpecFlowWithNUnit– just SpecFlow and NUnit.SpecFlowWithNUnitAndShould– depends onSpecFlowWithNUnitand adds Should.SpecFlowWithNUnitAndShouldAndMoq– and so on.
You can also manage versions of dependencies by simply not specifying version numbers in the NuGet Package Explorer.
This approach is great for sharing repositories within a team, company, or group.
I hope you find this helpful.